How To Go Tubeless
The ultimate tubeless-tire tip list
How To Go Tubeless
If you have never tried riding tubeless tires, you’re missing out. Tubeless tires allow riders to run lower pressures without fear of the dreaded “snakebite” flat, where the tire compresses against the rim, resulting in a two-hole shot to the inner tube that looks exactly like a snake leapt out from the side of the trail to ruin your ride.
We’d put tubeless tires right up there with the best innovations that improve ride quality, such as suspension forks, carbon frames, disc brakes and mid-ride chocolate chip cookies. The trouble is, tubeless tires can be finicky. They often refuse to seal. They leak, and the sealant dries up. Fortunately, with a bit of know-how and preventive maintenance, you can enjoy the awesome benefits of tubeless tires without the headaches. We’ll show you how.

1-The main reasons for running a tubeless setup are to reduce the number of flat tires and take advantage of lower pressures for improved traction. Be sure to check tire pressure before every ride with more than just a squeeze test. Even if you simply use a floor pump with a gauge, your tire pressure will be much more consistent. You get bonus points if you invest in a digital gauge like this one from SKS.
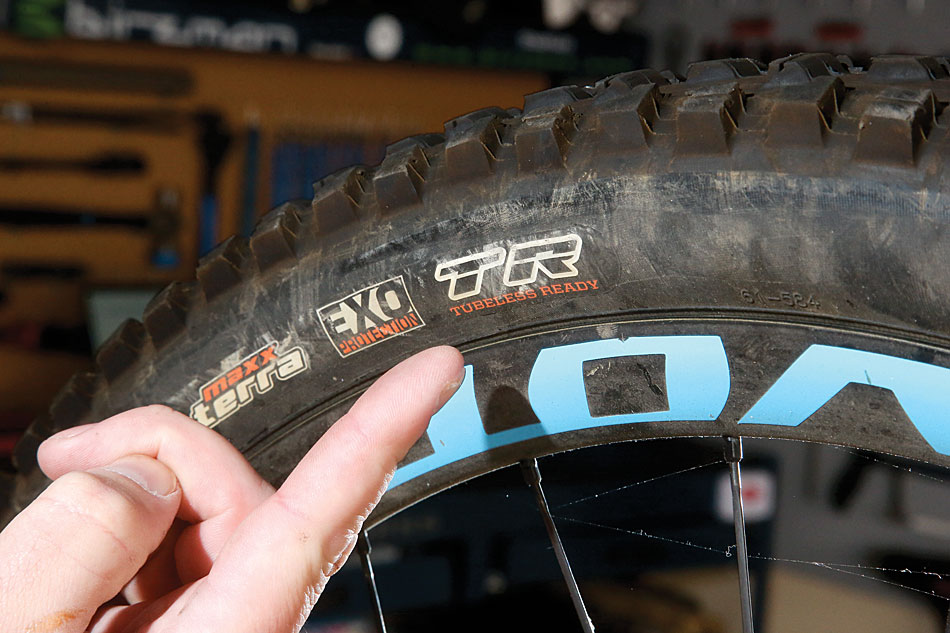 2-There are many options for tubeless-ready tires, and they go by many names, such as TLR, TR or Tubeless Easy. Essentially, all of these tires are meant to provide the same benefits. They have slightly thicker sidewalls to prevent air leakage and also provide more stability. They are not as lightweight as standard tube-style tires, but are well worth the small weight penalty for reliability.
 3-Virtually any rim can be converted to a tubeless setup. There are some that have no drilled spoke holes, which are the easiest to set up. There are also ones that come with specially designed rim strips to make them airtight. If your rims are drilled without a special rim strip, the spoke holes must be taped to prevent air loss.
 4-We’ve had mixed results with many of the sealants we’ve tried. If you’re not having luck with one, know that changing to a different one could be all the difference.
 5-Not all tubeless valves are created the same, even if they claim to be “universal.” Some have rounded or conical shapes, while others are more square. Choose one that fits nicely with the inner profile of your rims, and if one doesn’t work, try another. We’ve found the conical ones are typically the most reliable for the widest range of rim shapes.
 6-Most tire companies make a variety of tape to work with tubeless conversions. These are the best and most reliable solution for converting non-tubeless rims to tubeless.
 7-If a specially designed tubeless tape is not available, we know of several riders who swear by Gorilla Tape, which is available at any local hardware store. While it’s not specifically designed for the purpose, it is durable and airtight enough to get the job done.
 8-When converting a non-tubeless rim, start at the valve hole and wrap the tape around the rim. Adding a single layer of tape is usually sufficient. Adding more wraps of tape will make the tire fit tighter and can help with the seating process later. Adding too many layers of tape will make the tire too tight to mount. This is a trial-and-error process.
 9-Once you have the tape installed, it’s time to cut a hole for the valve. We like to use a razor blade for this. Rather than carving the entire circle out, we like to make an X with the blade, and then let the extra bits of tape be pushed through with the valve. Doing this creates a tighter seal between the rim, tape and valve.
 10-Whenever installing sealant, it’s best to read the directions on the bottle and measure out the correct amount to use. Simply pouring and then thinking “that looks about right” can lead to either air loss with not enough sealant or added rotational weight with too much. Different wheel sizes also vary quite a bit in the volume that they require.
 11-When pouring the sealant into the tire, it’s easiest if you already have one bead of the tire mounted. That way, you will minimize the spillage when finishing the tire installation.
 12-When installing the second bead, use gravity as your friend. It is possible to mount a tire without spilling a drop. However, if you’re not experienced with tubeless tires and sealant, this is best done over a surface that won’t stain if you do spill a little. There’s nothing worse than trying to explain the orange stain on the rug to your significant other. Should the worst happen, maybe blame it on the dog.
 13-With the sealant inside, you can snap the tire on the wheel as you would with a typical tubed setup. Be sure the beads of the tire are in the center of the rim, and use your thumbs to snap the last bit of tire bead onto the rim.
 14-If your tires are already set up tubeless and you only need to add sealant, you can do so through the valve rather than removing the tire. For this procedure, start by removing the valve core like so. There are specifically designed tools for this, although we’ve also done this plenty of times with a pair of pliers.
 15-If you’re using the valve method, look for a sealant that comes with an injector, like this one from Orange Seal. This bottle also comes with volume markings on the side of the bottle, so we know we’re putting the right amount into the tire.
 16-Orange Seal also provides this nifty dipstick to check the volume of sealant in the tire easily. Every brand of tire sealant we’ve ever tried will dry up eventually and should be refreshed at least every six to eight weeks.
 17-The best way to seat any tubeless tire is with a big burst of air. This will snap the beads onto the rim quickly and easily. While some rim and tire combinations will snap on using a standard floor pump, many will not. If you have access to a compressor and air valve, like this one from Prestaflator, this is the best tool for the job.
 18-Many companies are now making tubeless-specific floor pumps as well. These pumps have an extra chamber attached to them that can hold up to 300 psi and then be released in a single burst to seat the tire, much like a compressor would.
 19-There are also products like the Ride Air from SKS that hold a single burst of air pumped with your standard floor pump. These are particularly useful if you want to travel with a shot of air that can seat a tubeless tire, although you only get one shot, so don’t mess it up.

20-If you’re having trouble getting the tire beads to slide into place, it’s best to lubricate them. For this, we like to use diluted dish soap in a water bottle.
 21-Simply shake the soapy solution so that it foams, and then squirt those scrubbing bubbles onto the beads of the tire. This will allow the tire to seat more easily, and the bubbles will actually take up some space and prevent air loss during inflation.
 22-If the soapy water trick fails, there are many products out there designed specifically to lubricate tire beads. The Easy Fit product from Schwalbe has bailed us out of several stubborn tubeless-tire-seating debacles.
 23-It’s always best practice to take the tire off from time to time to refresh the sealant, but do not mix different formulas. When changing different brands of sealant, take the time to clean out the old and dried stuff from the inside of the tire as well as possible.

24-If you’re having leaking problems from the valve, it’s okay to tighten the valve nut. This will pull the valve in and could solve the leaking issue. However, don’t forget that if you do flat on the trail, you may still have to install a tube to get home. Don’t over-tighten any valve to the point where you can’t remove it for a trailside fix.