HOW TO CHECK AND REPLACE YOUR MOUNTAIN BIKE’S BRAKE PADS
How to Check and Replace Your Brake Pads
You can only ride as fast as you can stop. Since your brakes are the only thing slowing you down as you careen down the mountain, your pads are one of the most critical parts on your bike. They need attention from time to time, and we’re here to show you how to inspect these unsung heroes of your bike to be sure they’re working properly and how to replace them if they’re not.

ONE
In addition to your standard toolkit, you should have some clean paper towels, some isopropyl alcohol, and fresh pads. We like to put the alcohol in a spray bottle to make it easier to use, and there are a wide variety of stock and aftermarket pads to choose from. Be sure they’re labeled with your specific brake model on the packaging before buying.

TWO
Using a work stand for jobs like this will always make things easier, although there are probably some MacGyver types out there who could do without one. We like to put the bike on the stand “backward,” with the drivetrain facing in if we’re only going to be working on the brakes. This makes them easier to access.

THREE
Start by removing the wheel. While it may be possible to do this with the wheel in, it’s much, much easier without the rotor in the way.

FOUR
If you’re working on hydraulic brakes, be sure to never squeeze the lever with the wheel and rotor out. Doing so will push the pads and pistons out too far, which will mean they will have to be pried apart.

FIVE
Most brakes have a safety clip to prevent the retention pin from falling out even if it comes loose. This should be carefully removed with a scriber and set in a safe place.

SIX
Next, we’re going to remove the retention pin to free the pads. Our Avid X0 Trail brakes use a 3-millimeter Allen. Simply unthread it to remove it and then set it aside with the safety clip.

SEVEN
Now we can remove the old pads. Some pads will come out easily by hand. Our pads were so cooked and full of brake dust that they required needle-nose pliers to remove them.

EIGHT
Brake-pad sets come in three pieces. There are the two pads and the H-spring that goes in the middle of them. The H-spring helps the pads retract when the brake is released.

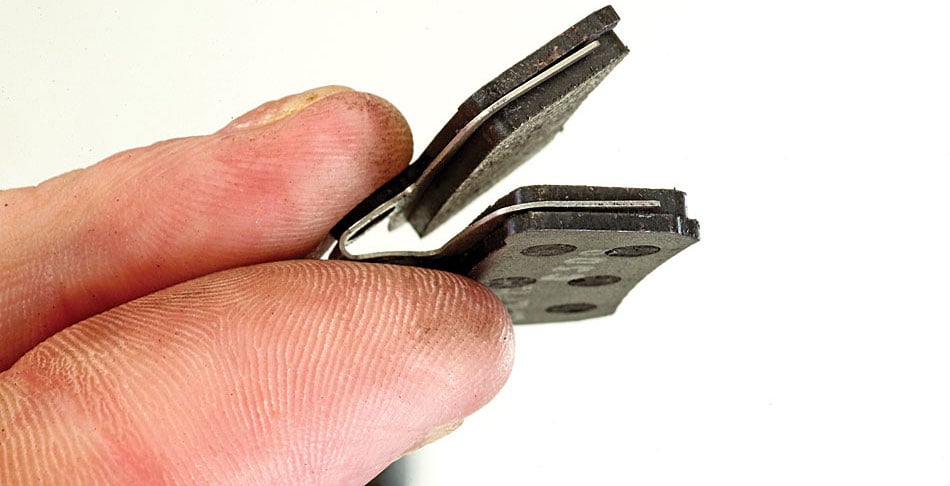
NINE
On the left you can see one of the worn-out pads we’re replacing. On the right is one of the new ones. Notice the difference in thickness?


TEN
Brake pads are made of two parts—the pad material and the backing plate. Pads should be replaced when the pad material thickness wears to less than 1 millimeter, or preferably sooner. Letting pads wear more than this puts you at risk of damaging the rotor or caliper, not to mention puts you at higher risk for brake failure. You can check this measurement using a caliper like so.

ELEVEN
If you’re replacing your pads because they’re contaminated and not because they’re worn, sometimes you can file them down to remove the contaminated portion and breathe some new life into them. However, it’s usually best practice to simply replace contaminated pads.

TWELVE
Hydraulic brake pads are designed to automatically compensate for pad wear by creeping in gradually as the pad wears down. Many riders will tell you to use a flathead screwdriver directly on the pads to push them apart, but this will likely gouge the pad material. Instead, use a more blunt object like the end of a wrench to gently push the pistons apart and back to their fully retracted position.

THIRTEEN
Now give the entire caliper a bath using the isopropyl alcohol and a clean paper towel. Remove as much grime and old brake dust as possible, and let it dry out for a few minutes.
FOURTEEN
With the pads fully retracted and the caliper clean, we’re ready to install the new pads. It’s easiest to do this by making a “spring sandwich” with the two pads and the H-spring in the middle.

FIFTEEN
We’re ready to slide the new pads into place. Our X0 Trail brakes are designed with top-loading pads, although some older brakes from other brands may require the pads be loaded from the bottom.

SIXTEEN
Replace the pad pin and tighten to keep the pads in place. This is a fairly low-torque bolt and only needs to be snugged and not super tight.

SEVENTEEN
Be sure to remember to replace the safety clip. We’ve been on rides with some who forgot this step, only to find their pads fly out in the middle of a rocky descent when the pin rattled loose. That’s not a good day for anyone.

EIGHTEEN
Replace the wheel in the frame, being careful to align the rotor between the fresh pads, and then reinstall the axle.

NINETEEN
In a perfect world the brakes would clear the new pads without rubbing and be ready to hit the trails. However, most brakes will need to be adjusted slightly after the new pads are installed. Center the caliper so the pads are equidistant from the rotor as you look down through the “pad window,” and then tighten the bolts.

TWENTY
Depending on your riding style and how much you use the front versus rear brake on the trail, you may only need to replace one set of pads at a time. But if you’re already doing one, you should at least always check the other.

TWENTYONE
A clean brake is a happy brake. Don’t be afraid to use isopropyl alcohol on the rotor to clean off any excess grime that may have found its way onto the rotor before testing the system.

TWENTYTWO
Enjoy hitting the trails with your new stoppers, and don’t forget tobed them in before you head out for your first ride. New pads require nearly the same break-in period as an entirely new set of brakes.
Subscribe & Renew Here
Mountain Bike Action is a monthly magazine devoted to all things mountain biking (yes, that’s 12 times a year because we never take a month off of mountain biking). It has been around since 1986 and we’re still having fun.